How to Boot Windows in Safe Mode: A Comprehensive Guide
-
 Jessica Williams
 - 19 Jul, 2024

When your Windows PC encounters issues, booting into Safe Mode can help diagnose and fix problems. Safe Mode starts Windows with a minimal set of drivers and services, making it easier to isolate and resolve software conflicts or malware infections. This guide will walk you through the steps to boot Windows in Safe Mode.
What is Safe Mode?
Safe Mode is a diagnostic mode in Windows that starts the operating system with only essential drivers and services. It helps troubleshoot and resolve issues by providing a clean environment, free from third-party software and drivers that may cause problems.
How to Boot Windows in Safe Mode
Method 1: Using the System Configuration Tool (msconfig)
Step 1: Open the System Configuration Tool
- Press
Windows + Rto open the Run dialog box. - Type
msconfigand pressEnter.
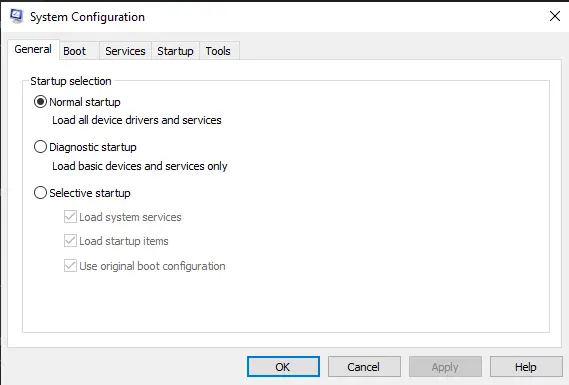
Step 2: Enable Safe Boot
- In the System Configuration window, go to the
Boottab. - Under
Boot options, check the box next toSafe boot. - Select
Minimalfor a basic Safe Mode orNetworkif you need internet access. - Click
Applyand thenOK.
Step 3: Restart Your Computer
- Click
Restartin the prompt that appears to reboot your computer in Safe Mode.
Method 2: Using the Shift + Restart Method
Step 1: Open the Power Menu
- Click the
Startbutton. - Click the
Powericon.
Step 2: Restart with Advanced Options
- Hold down the
Shiftkey and clickRestart. - Your computer will restart and take you to the
Choose an optionscreen.
Step 3: Navigate to Safe Mode
- Select
Troubleshoot. - Click
Advanced options. - Select
Startup Settings. - Click
Restart.
Step 4: Choose Safe Mode
- After your computer restarts, you’ll see a list of options.
- Press
4orF4to start in Safe Mode, or5orF5to start in Safe Mode with Networking.
Method 3: Using a Recovery Drive
If your computer won’t boot normally, you can use a recovery drive to access Safe Mode.
Step 1: Create a Recovery Drive
- Connect a USB drive to your computer.
- Type
create a recovery drivein the search box and select the option from the results. - Follow the on-screen instructions to create the recovery drive.
Step 2: Boot from the Recovery Drive
- Insert the recovery drive into the problematic computer.
- Restart the computer and boot from the USB drive (you may need to change the boot order in the BIOS/UEFI settings).
Step 3: Access Safe Mode
- Select
Troubleshootfrom the recovery drive menu. - Click
Advanced options. - Choose
Startup Settingsand clickRestart. - Press
4orF4to boot into Safe Mode.
Exiting Safe Mode
To exit Safe Mode and boot into Windows normally, follow these steps:
- Press
Windows + R, typemsconfig, and pressEnter. - Go to the
Boottab. - Uncheck the
Safe bootoption. - Click
Applyand thenOK. - Restart your computer.
Summary
Booting into Safe Mode is an effective way to troubleshoot and resolve issues with your Windows PC. Whether you use the System Configuration tool, the Shift + Restart method, or a recovery drive, you can easily access Safe Mode and diagnose problems in a clean environment. Follow this guide to ensure you can boot into Safe Mode whenever you need to fix your computer.